Assign Gear
Assign gear is the name of the feature that handles gear assignment. TMF does not support using arsenal loadouts for players as assign gear renders it inefficient and avoids its past bugs in doing so.
The assigngear system makes use of faction configs. These configs can either be in a mission or included in the modpack. Every faction config contains all roles within that faction (Eg. Rifleman, Fireteam Leader). Through the editor, you can then assign these roles to particular units.
Configuring unit role assignment
To use the assign gear component in Eden, right click on the unit(s) and click on Attributes. You will find the following section. This menu will automatically be filled will roles from faction configs that are present in either the mission file or modpack.
Switching faction configs
Tip! We provide a variety of finished presets through our mod pack, all of which can be found retrieved as .hpp files here.
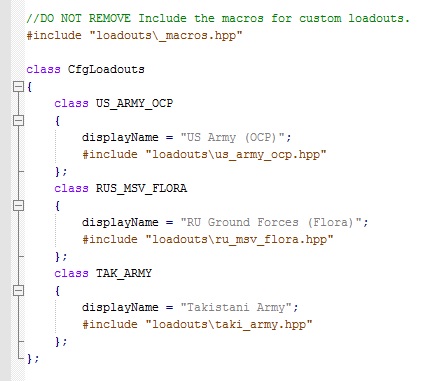
To add to or tweak the factions available in a mission, open the file description.ext in the mission folder. There is a section called 'class CfgLoadouts'
Here you can create extra factions, or override the default ones. For the units in the template, BLU_F, OPF_F, IND_F are used by default; if you change the class name of a faction to BLU_F it will be used by all BLUFOR units in the default template. This is because faction configs are first taken from the mission file, while the default 'vanilla' loadouts (NATO/CSAT/AAF/FIA) are contained in the modpack.
Creating/Modifying your own faction config
Text editors that support syntax highlighting are recommended for creating/modifying assigngear loadouts, for example Notepad++
If you wish to create your own, copy an existing config from the Loadouts folder in the mission's folder and modify it.
Config 101
Every role (rifleman/automatic rifleman etc.) requires its own class e.g.
class baseMan {};
Every class has properties with the general pattern of:
PROPERTY = VALUE;
Each of these properties is responsible for different things. For example the 'displayName' property is used as a description for this particular kit so if you use 'displayName = “Rifleman”;' that will set the description of that role to Rifleman. Note: There can not be two of the same property within a class.
There are also array properties. Arrays are lists which take the format of:
PROPERTY[] = {"element1", "element2", ... };
For example:
linkedItems[] = {"ItemMap","ItemCompass","ItemWatch"};
Here we have an array property called linkedItems that consists of 3 elements “ItemMap”, “ItemCompass” and “ItemWatch”.
Class Inheritance
Classes can inherit from others, for example 'class g : r' means that all the properties from class r now exist in class g with the same values. 'class g : r {};' would make class g exactly the same as class r. Any property we now set in g will override the value that is inherited from r. For example:
class g : r {
    displayName = "Grenadier";
};
Class g is still the same as r except the displayName has now been changed. This is useful for making variations of a given loadout; for example, often the only difference between a Grenadier and a Rifleman (g and r, respectively) is the primaryWeapon and the addition of launcher grenades:
class r : baseMan
{
    displayName = "Rifleman";
    headgear[] = {"rhsusf_lwh_helmet_marpatd"};
    vest[] = {"rhsusf_spc_rifleman"};
    primaryWeapon[] = {"rhs_weap_m16a4_carryhandle"};
    attachment[] = {"rhsusf_acc_anpeq15side"};
    magazines[] =
    {
        LIST_11("30Rnd_556x45_Stanag"),
        LIST_2("30Rnd_556x45_Stanag_Tracer_Red"),
        LIST_2("HandGrenade"),
        LIST_2("SmokeShell")
    };
    items[] =
    {
        LIST_3("ACE_fieldDressing"),
        "ACE_morphine"
    };
};
class g : r
{
    displayName = "Grenadier";
    primaryWeapon[] = {"rhs_weap_m16a4_carryhandle_M203"};
    magazines[] +=
    {
        LIST_8("1Rnd_HE_Grenade_shell"),
        LIST_4("1Rnd_Smoke_Grenade_shell")
    };
};
As displayed above, the primary weapon assigned to the Grenadier class overrides the one inherited from the Rifleman. However, in the case of magazines, the '+=' operator is used to append to the inherited array. In the above example, the Grenadier ('g') class is given all the same items as the Rifleman ('r') class, but with the addition of smoke and HE grenades for his grenade launcher due to the use of the '+=' operator in the magazines array.
Getting classnames
The easiest way to get the classname of items/weapons/uniforms etc. is to use ArmA 3's Virtual Arsenal (accessible from the main menu via Tutorials → Virtual Arsenal). In VA, you can give yourself the gear you wish to include in a loadout. Pressing the export button will copy the loadout to the clipboard. An example output will look like this:
comment "Exported from Arsenal by Snippers";

comment "Remove existing items";
removeAllWeapons this;
removeAllItems this;
removeAllAssignedItems this;
removeUniform this;
removeVest this;
removeBackpack this;
removeHeadgear this;
removeGoggles this;

comment "Add containers";
this forceAddUniform "rhs_uniform_cu_ucp";
this addItemToUniform "rhsusf_patrolcap_ucp";
for "_i" from 1 to 2 do {this addItemToUniform "ACE_fieldDressing";};
this addItemToUniform "ACE_morphine";
for "_i" from 1 to 2 do {this addItemToUniform "rhs_mag_30Rnd_556x45_M855A1_Stanag";};
this addItemToUniform "rhs_mag_an_m8hc";
this addItemToUniform "rhs_mag_m18_red";
this addVest "rhsusf_iotv_ucp";
this addItemToVest "rhsusf_ANPVS_14";
this addHeadgear "rhsusf_hgu56p_mask";

comment "Add weapons";
this addWeapon "rhs_weap_m4_carryhandle_pmag";

comment "Add items";
this linkItem "ItemMap";
this linkItem "ItemCompass";
this linkItem "ItemWatch";
It's recommended to paste the Virtual Arsenal export into an empty text file besides the config; From there, you can find the classnames of the items you wish to use and paste them into the appropriate arrays in the faction config.

